Apple screen sharing is a handy remote access tool that allows you to view and manipulate another Mac’s desktop regardless of the distance between the computers. This is especially helpful in collaborative projects, as well as for online webinars, live streaming and troubleshooting technical issues.
There are many apps and ways to screen-share on a Mac. In this article, we will review Apple’s own built-in utilities as well as some alternative methods.
How to activate screen sharing
First thing you do when you think about how to share your screen on a Mac is utilize the readily available tools in your computer. There is no need to download any third-party applications—Apple has got you covered.
How to activate screen sharing on a Mac for free:
1. Go to the Apple menu in the top left corner of the screen
2. Open System Preferences
3. Select Sharing from the third pane
4. In the list on the left side of the window, check the box next to Screen Sharing to make your computer visible to other devices.

You can make yourself accessible to all users who have your permission, or restrict access only to certain users in your network. You can also click on the Computer Settings button to open connection to VNC users that have the password to your session.
How to access a remote Mac
To connect to another Mac via screen sharing, make sure the other user has activated their session. Ask them to copy and send you their Mac’s name and address which can be found on the right under the Screen Sharing: On heading. The name should look like Jane’s MacBook Pro, and the address should be vnc://[IPAddress] or vnc://[Name.Domain]. When you have the details, the procedure is quite simple.
How to start a remote screen sharing session with another Mac:
1. Open Finder in the Dock
2. Under the Locations heading, click on Network and select the Mac you want to connect to. Choose Share Screen from the menu

3. If you can’t see the Network option, your Mac’s locations might be hidden. Point the mouse at the heading and click on Show that appears on the right
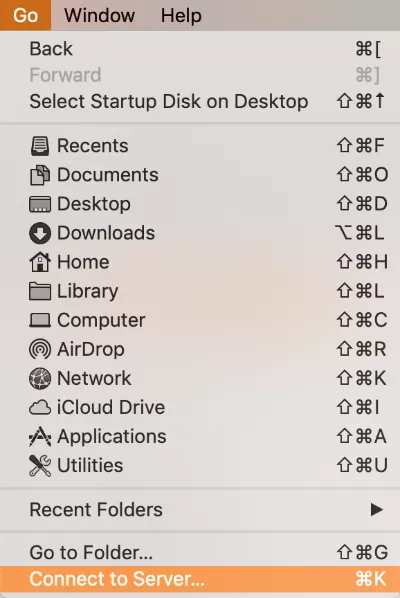
4. You can connect using the VNC address. In Finder, click on Go in the top menu bar and select Connect to Server. Enter the address in the window that appears
5. When you attempt a connection, you’ll be prompted to sign in. Simply enter your user name and password
6. If both the computers are logged in to the same Apple ID account, the session will start. If not, you need to enter the username and password of the person whose computer you’re trying to access.
You can start sharing your screen at any point during the session. Request permission from the owner of the session to activate this option. If you’re connecting through a network that is utilised by other users, you will see a notification asking if you want to share your screen with other users as well.
Share your screen over the internet via iMessage
Screen sharing over the internet is a faster and easier way of sharing your desktop on Mac. The best way to approach it is through iMessage. As a bonus, you can even connect to an iPhone or iPad.
How to screenshare on a Mac with iMessage:
1. Message the person you want to start a session with
2. In the top right corner of the window, click on Details to open a menu

3. Click the Share Screen button

4. You have two options: either to share your screen and invite the recipient to view it, or to request them to share their screen with you
5. Immediately after the invitation or request is accepted, an audio call starts, and a Screen Sharing app opens
6. You can stop sharing your screen any time by clicking on the screen sharing button in the menu bar and selecting End screen sharing from the drop-down menu. You can also quit a session by selecting the Quit option from the same menu.
Screen Sharing Alternatives
If OS X screen sharing doesn’t work for you, you can opt for a third-party app. Fortunately, there are plenty of free and inexpensive options on the App Store. But not everyone knows that some of the already familiar utilities that you use all the time have a built-in screen sharing tool—take Skype, for instance. All you need to do is to click on the Share Screen button when you’re on call with someone.
Other screen sharing alternatives:
- Zoom. This app has revolutionised the world of online communication as it is superior to Skype in almost every aspect. Better privacy, excellent connection speed and quality—it has it all. You can share your screen during a Zoom call by clicking on the Share Screen button
- TeamViewer. Out of all the Mac to Mac screen sharing tools that there are, TeamViewer is the most accessible one. The basic version is completely free. You can not only view, but also control another Mac’s desktop if you have the unique password and ID number that change each time you start a new session
- Screenleap. This option is ideal for cross-platform screen sharing. Need to connect to a Windows PC? Screenleap is an easy fix. The only downside is that you need to enable Java on your Mac, which can be a security risk if you’re not careful
- USE Together. This app is ideal for developers and creative artists that need to work on a group project due to its central selling point—the ability to use several mouse cursors at the same time.